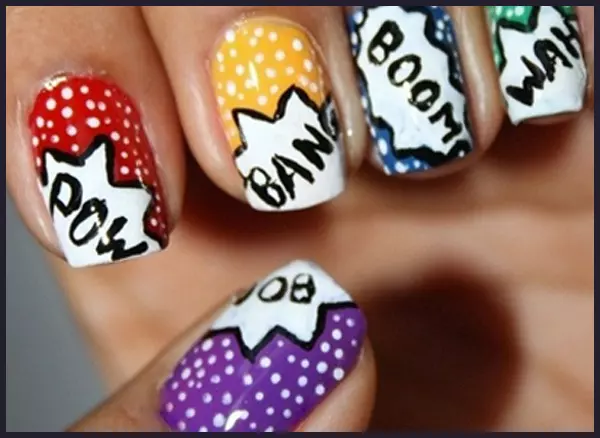
There are various nail arts available for different looks. From simple, elegant designs to playful, funky ones, nail art is for all. There is nail art for all lengths of nails — short, medium, or long. In addition, there are several easy nail art designs that you could do by yourself at home without prior expertise. In this article, we have mentioned one design with a step-by-step tutorial for nail sculpting to help you design short nails. It is the colorful comic pop art tutorial, which is absolutely doable in the comfort of your home. You will just need a few basic nail colors, a topcoat, and some patience for the ultimate nail decoration process!
Products You Will Need
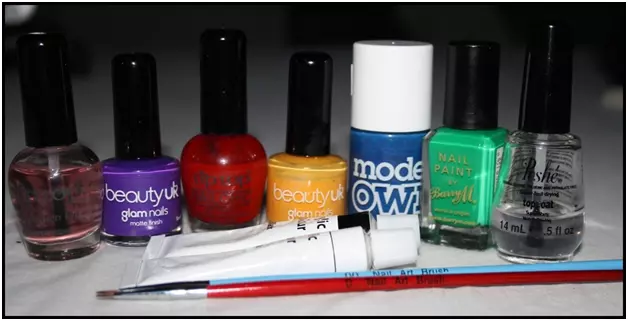
A base coat to form the first coat on your nails A top coat to apply over the base coat Different and bright coloured nail polishes of your choice Black and white acrylic paints or nail varnishes Nail art brushes or a thin brush to create nail art designs.
Remember: Acrylic paints will become long-lasting and waterproof when you apply a top coat
Stepwise Procedure
Step 1
Apply a base coat
Step 2
Now apply two coats of each different colored nail polish on your nails.
Step 3
Let them dry completely.
Step 4
Apply a layer of quick dry topcoat as this will help in removing the acrylic paint without disturbing the nail color.
Step 5
Take a white acrylic color and mix some water in it.
Step 6
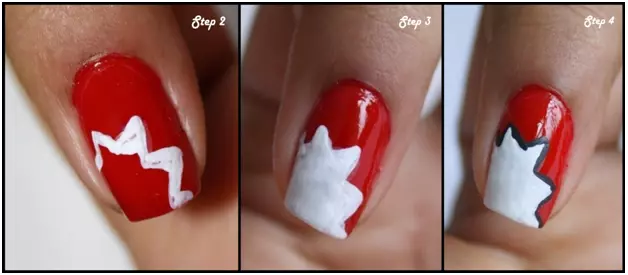
With this mix, draw some spikes on your nails (this is marked as step 2 in the below picture. Fill in the spikes as shown in step 3.)
Step 7
Finally, use a thin brush to outline the spikes with a black nail color (marked in the image as step 4.)
Step 8
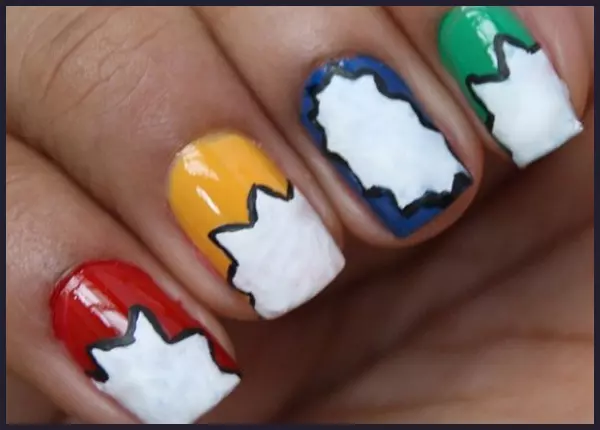
Follow this pattern on all your nails. You can be as creative as you can and create different designs too. Here is how it will look once you have created and filled in the spikes:
Step 9
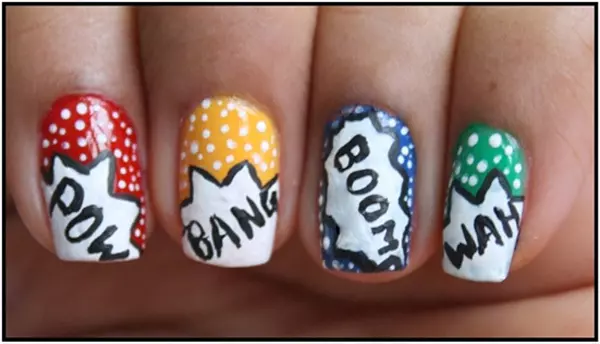
Now write some pop words inside the explosions like BOOM! WAH, BANG, Ka-Pow, CRASH! Of course you can write any words of your choice.
Step 10
Randomly place small white acrylic dots in the remaining area.
Step 11
Do the clean up around the nails using water or a nail polish remover.
Step 12
Next, apply a layer of top coat.
And Voila now you have a funky and attractive nail design for short nails! Here is how it looks! Don’t forget to explore more nail designs for short nails to understand that when it comes to nail art, the sky’s the limit. Hope you will surely try this nail art design and don’t forget to tell us all about it. You can also add nail embellishments or nail stickers to accentuate the look. Nail stamping using fun stamps and adding over nail rhinestones might also give the nails a unique classy look! Zey, a lifestyle blogger, shares the best way to remove nail paint off the skin from her own experience: “I find that when I try to clean up around the edges of my nail, the Q-tip just ends up removing some of the polish off my nail, too. Instead, take a shower. That will take the nail polish off your skin without removing it from your nails (i).” How long does nail art last? Nail art normally stays for as long as 2 weeks. However, it depends on the type of paint you choose and how well you maintain it. To maintain longevity, try nail shaping every few days. Is nail art good for nails? Yes, nail art or nail painting is a great way to decorate your nails and add a punch of fun. It can add stunning grace and beauty to your hands and make you look more confident and stylish. Can nail art damage nails? No, Acrylic paints do not damage your nails, but using the paint excessively or for long periods, rubbing nails, and scraping paint vigorously may lead to damage to nails and cuticles. So, allow your nails to be free of paint occasionally and practice effective nail care. How do I choose the right colors for my nail art design? Any color is fine for nail paint. However, for special occasions, you may want to match it with your dress or accessories, skin tone, or lip shade. For a casual bold look, you may try nail artistry using yellow, coral, bright red, or even black and white. When in doubt, you can play it safe with a nude shade, some nail glitter, or pink tints.
Illustration: A Simple Nail Art Design: A Step-By-Step Tutorial
Check out this video compilation of 10 easy nail art designs! Get creative and find the perfect design that matches your vibe.